
Throughout this course, you have learned two powerful methodologies: Smart Money Concepts and Order Flow analysis. Each provides valuable information independently, but when combined, they create an edge that exceeds either alone. This article shows you how to synthesize these approaches into a unified trading system.
The Synergy of SMC and Order Flow
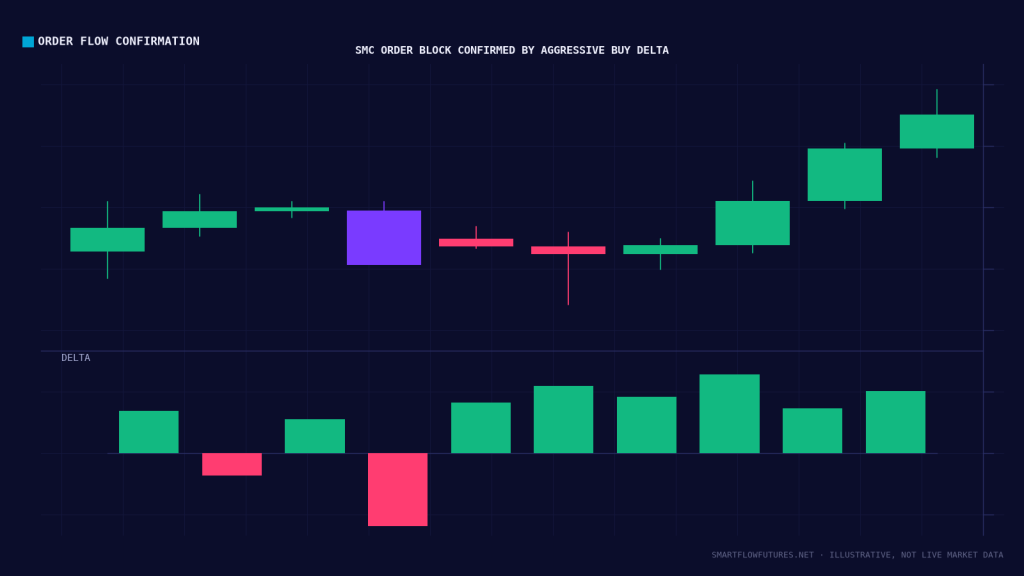
SMC and Order Flow are complementary, not competing:
SMC Provides: Context, where to look for trades. It identifies key levels, market structure, and the footprints of institutional activity through price patterns.
Order Flow Provides: Confirmation, what is happening at those levels in real-time. It shows whether institutions are actually defending levels, the strength of moves, and the nature of order activity.
Together, you know where to trade (SMC) and have real-time validation that your thesis is correct (Order Flow).
The Combined Analysis Framework
Step 1: SMC Analysis (Context)
Determine higher timeframe bias using market structure. Identify key levels: order blocks, FVGs, liquidity pools. Mark these levels on your chart. Form a trading plan: where will you look for trades?
Step 2: Wait for Price
Be patient. Let price come to your predetermined SMC levels. Do not chase or anticipate.
Step 3: Order Flow Confirmation
When price reaches your SMC level, observe Order Flow. Check footprint for imbalances or absorption. Monitor delta for alignment with your thesis. Watch the tape for institutional activity. Look for iceberg patterns at the level.
Step 4: Execute with Confluence
When SMC level and Order Flow confirmation align, take the trade. If Order Flow does not confirm, wait or skip.
Combining Specific Concepts
Order Block + Absorption:
You identify a bullish order block on the 15M chart. Price returns to this level during NY killzone. The footprint shows heavy volume at the level without price breaking, while the tape shows repeated buying at the bid as price holds. On the DOM, bids get refilled as fast as they’re hit. Enter long with confidence. The order block thesis is confirmed by absorption.
FVG + Delta:
A bearish FVG exists above current price. Price rallies into the FVG. Monitor cumulative delta as price enters the gap. If delta is negative or flat despite rising price, that divergence confirms the FVG as a selling zone. Enter short with delta confirmation.
Liquidity Sweep + Footprint Reversal:
Sell-side liquidity below recent lows. Price sweeps this liquidity (breaks below). On the footprint, stacked buying imbalances appear as price sweeps. Delta turns sharply positive after the sweep. Enter long. The sweep provided fuel, and footprint confirms reversal.
OTE + Volume Profile:
Price retraces into the OTE zone (62-79%). Check Volume Profile. Is there a high volume node within the OTE? If so, you have confluence: Fibonacci-based entry zone plus a volume-validated level. Enter with higher confidence.
Order Flow Veto Power
A critical rule: Order Flow can veto SMC setups.
You have a beautiful SMC setup: order block in discount, aligned with higher timeframe trend, during killzone. But Order Flow shows aggressive selling continuing into the order block with no absorption. Delta is negative and trending more negative.
The SMC setup is there, but Order Flow is not confirming. Skip the trade or wait for Order Flow to change.
Conversely, if Order Flow strongly confirms but SMC level is marginal, the Order Flow strength may warrant a trade.
Practical Integration
Pre-Session (SMC Focus):
Complete your SMC analysis. Mark all relevant levels. Determine bias and plan. No Order Flow needed yet.
During Session (Order Flow Focus):
When price approaches your levels, engage Order Flow tools. Monitor footprint, delta, tape as price reaches each SMC level. Make entry decisions based on Order Flow confirmation.
Trade Management (Combined):
Use SMC levels for targets and stops. Use Order Flow to assess trade health and adjust management. Exit early if Order Flow turns against your thesis.
Common Integration Mistakes
Over-Reliance on One Method: Using only SMC without Order Flow confirmation, or only Order Flow without SMC context. Both are needed.
Analysis Paralysis: Waiting for perfect confirmation across every indicator. Some confirmation is enough; perfect alignment is rare.
Conflicting Signals: SMC says buy, Order Flow says sell. In this case, wait for alignment or skip. Conflicting signals are a signal themselves. Stay out.
Ignoring Time: Applying the combined approach during low-activity hours. Order Flow data is more meaningful during killzones.
Sample Trade: Combined Approach
Context: NQ, Tuesday, NY session. Daily trend is bullish. You have marked a 4H bullish order block in the discount zone.
Setup Develops: Price retraces during the morning, reaching your order block around 10:30 AM.
Order Flow Confirmation:
On the 5M footprint, absorption appears at the order block level. Delta turns from negative to positive within the zone. Tape shows repeated buying and iceberg-like refreshing on the bid.
Execution:
Enter long at 10:35 AM after 5M candle confirms with positive delta. Stop below the order block. Target: the morning high.
Result:
Price bounces from the order block, confirming the thesis. You reach target within an hour. SMC identified the level; Order Flow confirmed it was being defended.
Building Your Combined System
Take time to develop your personal synthesis:
1. Master SMC concepts first: you need to know where to look.
2. Add Order Flow one tool at a time: footprint, then delta, then tape.
3. Practice seeing how Order Flow behaves at your SMC levels.
4. Document what Order Flow patterns precede successful trades at SMC levels.
5. Refine your process until confirmation patterns become intuitive.
Key Takeaways
SMC provides context (where to trade); Order Flow provides confirmation (what is happening there). The combined approach is more powerful than either alone. Complete SMC analysis first, then wait for Order Flow confirmation at key levels. Order Flow can veto SMC setups if it does not confirm institutional defense. Develop your personal integration through practice and documentation.