
In our previous article, we explored bullish order blocks, zones where institutions accumulate long positions. Now we turn to their counterpart: bearish order blocks. These are the zones where smart money enters short positions, and understanding them is essential for identifying high-probability selling opportunities.
What is a Bearish Order Block?
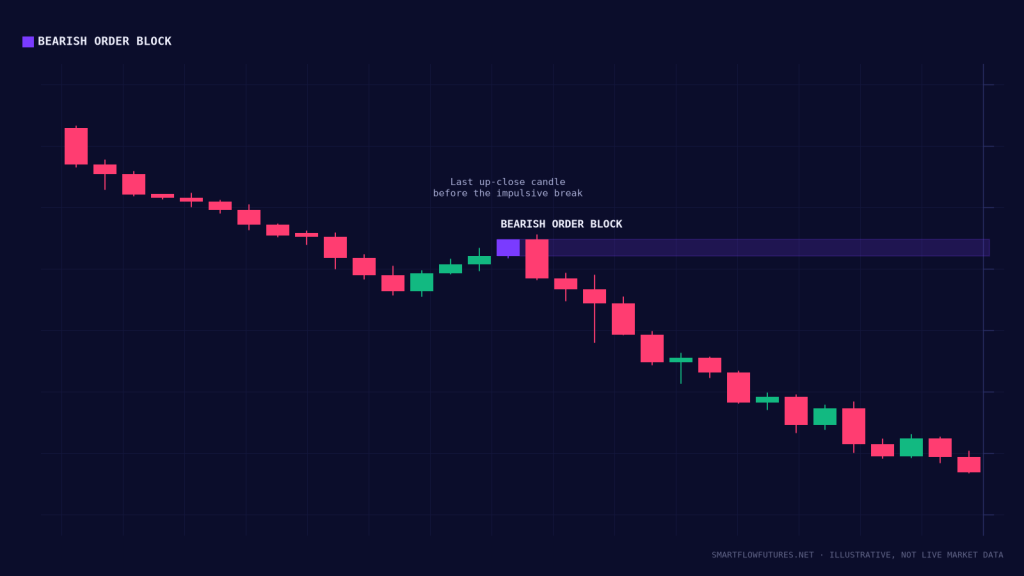
A bearish order block is the last bullish (up) candle before a significant downward move. This candle represents the final buying before institutions overwhelm the market with selling pressure. When price returns to this zone, we expect it to act as resistance, a place where sellers are likely to defend their positions.
Think of it this way: if institutions sold aggressively from a certain price zone, they have a vested interest in not letting price move significantly above their entry. When price returns, they often add to their positions, creating renewed selling pressure.
Identifying Bearish Order Blocks
The identification process mirrors that of bullish order blocks but in reverse:
Step 1: Identify Bearish Market Structure
Look for a market making lower highs and lower lows. We want to trade with the trend, not against it.
Step 2: Find a Significant Down Move
Look for a strong, impulsive move downward, ideally one that causes a Break of Structure (BOS) to the downside.
Step 3: Locate the Last Bullish Candle
Before this down move began, find the last green (bullish) candle. This is your bearish order block.
Step 4: Mark the Zone
The order block zone extends from the open to the high of this candle. This entire area is your potential entry zone for short positions.
Quality Assessment for Bearish Order Blocks
Not all bearish order blocks are created equal. High-quality order blocks share these characteristics:
Causes Break of Structure: The move from the order block should break below a previous swing low. This confirms institutional commitment to the downside.
Located in Premium Zone: The best bearish order blocks form in premium territory, above the 50% level of the current range. Selling in premium provides better risk-reward.
Higher Timeframe Alignment: Order blocks on higher timeframes carry more significance. A 4-hour bearish order block is stronger than a 15-minute one.
Untested (Fresh): Order blocks that havent been revisited since formation are more powerful. Once tested, their strength diminishes.
Strong Move Away: The more aggressive the selling after the order block forms, the stronger the institutional commitment to that level.
Weaker Bearish Order Blocks to Avoid
Be cautious of order blocks that show these characteristics:
Formed during consolidation rather than trending conditions. Multiple tests already. Each touch weakens the zone. Small, indecisive candle as the order block. Move away was weak or quickly retraced. Located in discount zone (below 50% of range).
Trading Bearish Order Blocks
Entry Approach 1: Limit Order (Aggressive)
Place a sell limit order at the bottom of the order block zone (the open of the candle). This ensures entry if price reaches the zone but may result in getting filled before confirmation.
Entry Approach 2: Confirmation Entry (Conservative)
Wait for price to enter the order block zone, then drop to a lower timeframe and look for bearish confirmation: a CHOCH, bearish engulfing pattern, or rejection wick. Enter short after confirmation appears.
Stop Loss Placement
Option 1 (Tight): Place stop just above the order block high. This provides the best risk-reward but may get stopped by wicks.
Option 2 (Moderate): Add a buffer of a few ticks above the order block high. Balances protection with reasonable stop distance.
Option 3 (Wide): Place stop above the next structural high. Provides maximum protection but reduces risk-reward ratio.
Target Selection
Common targets for bearish order block trades include: previous swing low, next bullish order block below, discount zones (below 50%), unfilled Fair Value Gaps below, and measured move projections based on the impulse that created the order block.
Multi-Timeframe Approach
The most reliable bearish order block trades use multiple timeframes:
Higher Timeframe (Daily/4H): Establish bearish bias and identify major bearish order blocks. This tells you the overall direction.
Medium Timeframe (1H/4H): Find specific order blocks for trade planning. These are your primary trading zones.
Lower Timeframe (15M/5M): Time your entry and look for confirmation. This refines your execution.
Example Trade Walkthrough
Let us walk through a complete bearish order block trade:
Context: The 4-hour chart shows ES in a downtrend with recent lower highs and lower lows. A bearish order block has formed in premium territory.
The Setup: On the 1-hour chart, you identify the last bullish candle before a significant drop that broke structure. Mark the zone from open to high.
The Entry: Price rallies back to the order block. On the 15-minute chart, you see price enter the zone and form a bearish engulfing pattern with a rejection wick.
Trade Management: Enter short at the close of the bearish candle. Stop loss goes above the order block high plus buffer. Target is the previous swing low or bullish order block below.
Common Mistakes to Avoid
Trading Against Higher Timeframe Trend: Even a perfect bearish order block can fail if the higher timeframe is bullish. Always check the larger context.
Entering Without Confirmation: Limit orders at order blocks can work, but blindly selling every touch leads to unnecessary losses. Consider waiting for reaction.
Ignoring Premium/Discount: Shorting bearish order blocks in discount zones offers poor risk-reward. Look for setups in premium areas.
Poor Position Sizing: Even high-probability trades fail. Size positions so that stop-outs dont damage your account.
Giving Up After Failures: Not every order block trade works. The edge comes from consistent execution over many trades, not from winning every time.
Key Takeaways
Bearish order blocks mark zones where institutions have committed to selling. They form as the last bullish candle before significant down moves. Quality matters: look for blocks that caused BOS, sit in premium, and remain untested. Use multiple timeframes for the highest probability setups. Risk management is essential; even the best setups can fail.