
The Optimal Trade Entry (OTE) is one of the most precise entry techniques in the SMC toolkit. It combines Fibonacci retracement levels with Smart Money Concepts to find trade entries at better prices with strong risk-reward potential.
What is Optimal Trade Entry?
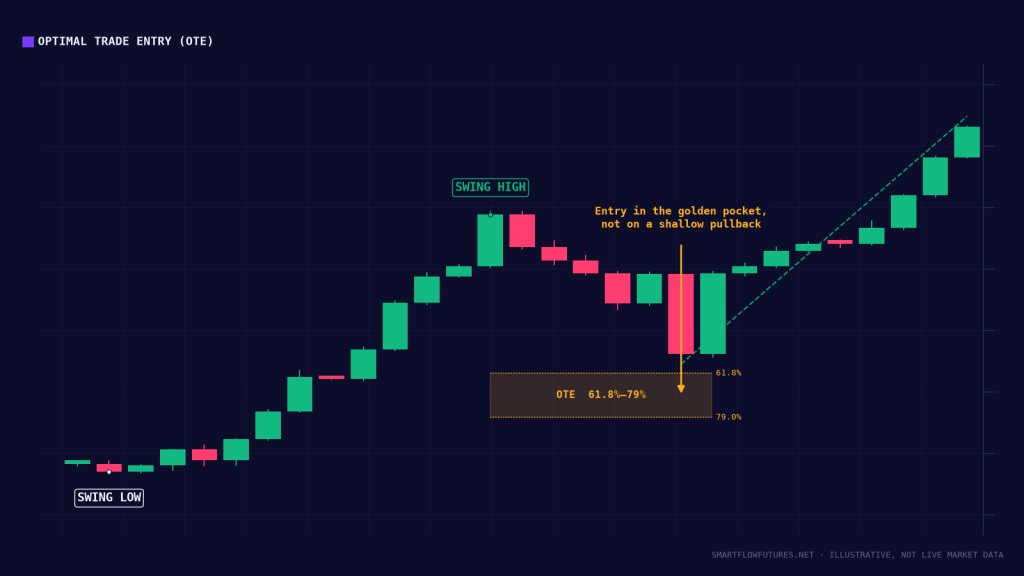
OTE refers to a specific zone within a price retracement where the probability of reversal is highest. This zone typically falls between the 61.8% and 78.6% Fibonacci retracement levels of an impulse move. When this zone coincides with an order block or fair value gap, you have an optimal entry point.
The concept is rooted in both mathematics (Fibonacci) and market structure (SMC). Price tends to retrace a portion of its move before continuing, and the OTE zone represents the sweet spot where retracement often ends and continuation begins.
The OTE Zone Explained
The OTE zone spans from the 62% to 79% retracement level, with three reference points:
61.8% (Golden Ratio): The shallow end of the OTE zone. Quick, strong trends may reverse here.
70.5% (Sweet Spot): The middle of the OTE zone. Many traders focus entries around this level.
78.6% (Deep Retracement): The deep end of the OTE zone. Provides the best entry price but may not always be reached.
Beyond 79%, the probability of trend continuation decreases significantly. A retracement beyond this level often signals potential trend change rather than continuation.
Drawing the OTE Zone
For Bullish OTE (buying the dip):
Identify a completed bullish impulse move from swing low to swing high, then apply Fibonacci retracement across that same range. The zone between 61.8% and 78.6% retracement is your OTE zone. Look for confluence with order blocks or FVGs inside it.
For Bearish OTE (selling the rally):
Identify a completed bearish impulse move from swing high to swing low, then apply Fibonacci retracement across that same range. The zone between 61.8% and 78.6% retracement is your OTE zone. Look for confluence with bearish order blocks or FVGs inside it.
OTE and Order Block Confluence
The most powerful OTE setups occur when the zone contains an order block:
Scenario: Price makes a bullish impulse that breaks structure, and an order block forms somewhere within that move. When you draw Fibonacci from the swing low to the swing high, that order block falls inside the 62-79% zone.
This confluence significantly increases probability. You have the mathematical significance of Fibonacci combined with the institutional footprint of an order block.
OTE and Fair Value Gap Confluence
Similarly, FVGs within the OTE zone create high-probability setups:
The price imbalance (FVG) attracts price for rebalancing, and the OTE zone marks where that reversal is most likely to end. When the two align, you can enter with confidence and clear risk parameters.
Trading the OTE
Step 1: Identify the Impulse
Look for a clean impulse move that broke structure (BOS). This confirms institutional direction and provides anchor points for your Fibonacci.
Step 2: Draw Fibonacci
Apply the Fibonacci tool from the start to the end of the impulse. Identify the 62-79% zone.
Step 3: Look for Confluence
Check if order blocks, FVGs, or other SMC elements exist within the OTE zone. More confluence means higher probability.
Step 4: Wait for Price
Let price retrace into the OTE zone. Do not anticipate or front-run.
Step 5: Confirm and Enter
Look for lower timeframe confirmation within the zone: rejection candles, lower timeframe CHOCH, or engulfing patterns. Enter with stops beyond the zone.
Stop Loss Placement
For OTE trades, stop placement is logical:
Conservative: Beyond the swing point that started the impulse. This gives maximum room but reduces reward-to-risk.
Moderate: Beyond the 79% retracement level. If price exceeds this, the setup is likely invalid.
Aggressive: Just beyond the order block or FVG within the OTE zone. Tightest stop, best reward-to-risk, but more prone to stop-outs.
Target Setting
OTE trades naturally target the impulse high or low (100% extension) and often beyond:
First Target: The high/low of the impulse you measured from. Taking partial profits here is logical.
Second Target: The -27% or -62% Fibonacci extension levels beyond the impulse.
Extended Target: The next significant liquidity pool or higher timeframe level.
OTE Quality Factors
Not all OTE setups are equal. Higher quality setups have:
A clean impulse with a clear BOS, an order block or FVG inside the OTE zone, alignment with the higher timeframe trend, entries timed to a killzone, and more than one confluence factor stacking together.
Common OTE Mistakes
Front-Running: Entering before price reaches the OTE zone. Wait for price to come to you.
Ignoring Context: OTE against the higher timeframe trend has lower probability. Check your bias first.
No Confluence: An empty OTE zone (no OB or FVG) is weaker. Look for supporting factors.
Forcing the Setup: Not every impulse will retrace to OTE. Accept that some moves run without pullback.
Key Takeaways
The OTE zone (62-79% retracement) is the optimal area for trend-continuation entries, and pairing it with an order block or FVG produces the highest-probability setups. Wait for price to reach the zone rather than anticipating it, confirm with a lower timeframe signal before entering, and place stops beyond the zone with targets extending past the impulse.