
Fair Value Gaps represent price imbalances that markets often return to fill. The FVG Retest entry model provides a structured approach to trading these zones with precision entries and clearly defined risk parameters.
The FVG Retest Concept
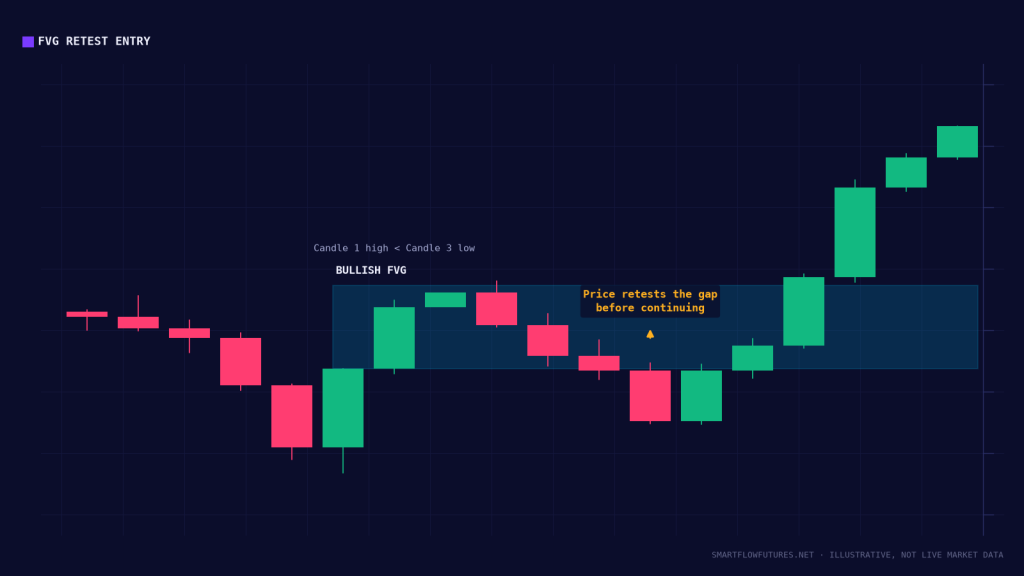
When price creates an FVG during an impulse move, it often returns to that zone before continuing. This retest gives you a clear zone to enter (the FVG), a logical stop placement beyond it, and a defined target at the impulse continuation.
The key is waiting for the retest rather than chasing the initial impulse.
Setup Requirements
1. Valid FVG Formation:
Three-candle pattern with gap between wicks of candle 1 and candle 3. Clear gap, not just a small space. Formed during a momentum move (not during consolidation).
2. Context Alignment:
FVG aligns with higher timeframe direction. In discount for bullish FVGs, premium for bearish FVGs. Near or at a significant SMC level.
3. Fresh FVG:
Preferably untested since formation. First retest is typically strongest. Multiple tests weaken the zone.
Bullish FVG Retest Entry
Setup:
Bullish FVG forms during upward impulse. Price retraces back toward the FVG. Higher timeframe bias is bullish.
Entry Options:
Option A – Limit Order at FVG Top:
Place limit buy at the top of the FVG (candle 1 high). Stop below FVG low. Most aggressive, best price, but may not fill.
Option B – Entry at Consequent Encroachment (50%):
Enter at the 50% level of the FVG. This is often the key reaction level. Better fill probability than Option A.
Option C – Confirmation Entry:
Wait for price to enter FVG and show bullish rejection. Enter on confirmation candle (engulfing, pin bar). Safest but worst price.
Stop: Below the FVG low (candle 3 low) with buffer.
Target:
Target 1: High of the impulse that created the FVG.
Target 2: Next significant resistance or liquidity above.
Bearish FVG Retest Entry
Setup:
Bearish FVG forms during downward impulse. Price retraces back toward the FVG. Higher timeframe bias is bearish.
Entry Options:
Option A – Limit Order at FVG Bottom:
Place limit sell at the bottom of the FVG (candle 1 low). Stop above FVG high.
Option B – Entry at Consequent Encroachment (50%):
Enter at the 50% level of the FVG.
Option C – Confirmation Entry:
Wait for price to enter FVG and show bearish rejection. Enter on confirmation candle.
Stop: Above the FVG high (candle 3 high) with buffer.
Target:
Target 1: Low of the impulse that created the FVG.
Target 2: Next significant support or liquidity below.
Order Flow Enhancement
Add Order Flow for better entries:
At FVG Entry:
Watch for absorption as price enters the FVG. Look for delta shifting in your direction. Stacked imbalances in your favor confirm the zone is holding.
Confirmation Signals:
Price enters FVG and aggressive selling (for bullish) is absorbed. Delta turns positive. Enter on the shift.
FVG Quality Factors
Not all FVGs are equal:
Timeframe: Higher timeframe FVGs are more significant. A daily FVG has more weight than a 5M FVG.
Size: Moderate-sized gaps are ideal. Too small may not offer enough room. Too large may not fill completely.
Context: FVGs at order blocks, in premium/discount, or at key levels are higher probability.
Freshness: First test is best. Second test is acceptable. Third test or more, the zone may be exhausted.
Managing FVG Trades
If Price Fills the Entire FVG: The zone may be exhausted. Consider tighter management.
Partial Fill and Reversal: Often price fills to 50% and reverses. This is ideal.
Quick Rejection: If price barely enters the FVG and reverses strongly, the zone is powerful. Let the trade run.
Key Takeaways
FVG Retest trades capture the return to imbalanced zones. Entry options: limit at FVG top/bottom, 50% CE level, or confirmation. Stop goes beyond the FVG extreme; target is the impulse high/low and beyond. Higher timeframe FVGs at key SMC levels are highest probability. First test of an FVG is typically strongest. Order Flow confirmation (absorption, delta shift) enhances the setup.