
Entry is only the beginning. How you manage a trade from entry to exit often determines profitability more than the entry itself. This article covers the complete lifecycle of trade management, from initial position to final exit.
The Trade Management Mindset
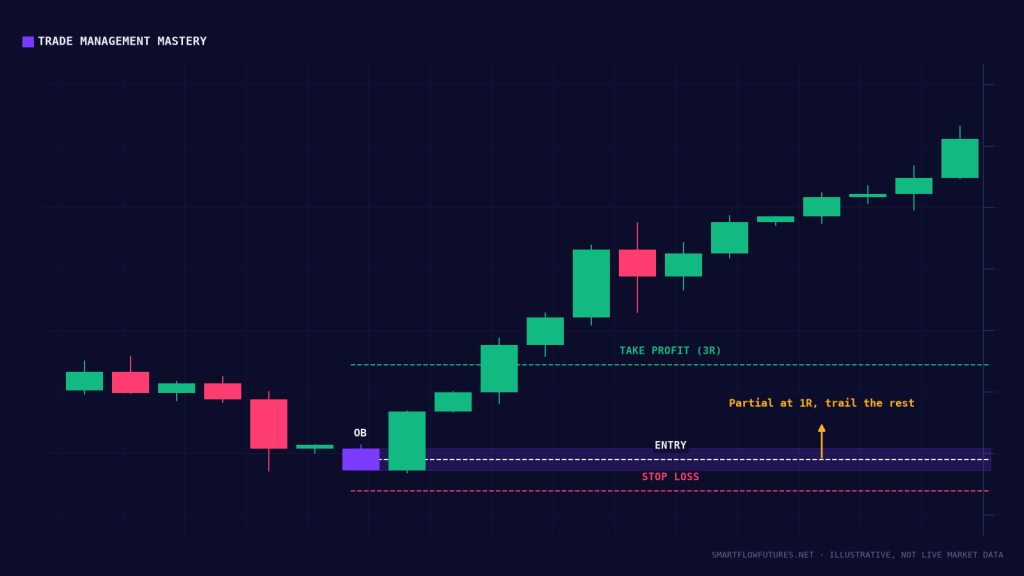
Once entered, your job changes:
Before Entry: Find the highest probability setup. Determine entry, stop, and target.
After Entry: Execute your plan. Manage the trade according to rules. React to market information appropriately.
The best traders are flexible after entry while remaining disciplined. They respond to what the market shows them without abandoning their overall plan.
Initial Stop Placement
Your initial stop should be:
Structural: Beyond a level that, if reached, invalidates your thesis. For order block entries, beyond the OB. For liquidity sweep entries, beyond the sweep high/low.
Not Arbitrary: Avoid round-number stops like “20 points” unless they coincide with structure.
Accepted: You must genuinely accept the loss amount before entering. If you cannot accept it, either do not trade or reduce size.
Scaling Out: The Partial Profit Approach
Taking partial profits has psychological and mathematical benefits:
Standard Scale-Out:
Take 50% at 1R (locks in profit, reduces risk).
Take 30% at 2R (captures extended move).
Let 20% run (captures home runs).
Benefits:
Locks in profit regardless of where price goes.
Reduces stress of watching open profit fluctuate.
Allows for runners that capture large moves.
Trade-Off:
Average exit is worse than holding full position to full target.
But average exit is much better than watching full position return to breakeven or worse.
Moving Stop to Breakeven
When you move your stop to breakeven matters:
The Rule: After 1R of profit, consider moving stop to breakeven (entry price).
Benefit: Worst case becomes 0R instead of -1R. This significantly improves expectancy over time.
Risk: You may get stopped at breakeven and then watch the trade go to target. Some runners are lost.
Balance: Consider moving to breakeven on 50% of the position and leaving wider stop on the runner portion.
Trailing Stops
Trailing stops protect profit while allowing trends to run:
Structure-Based Trail:
Move stop below each new swing low (for longs).
Move stop above each new swing high (for shorts).
Lets the trend define your exit.
ATR-Based Trail:
Trail stop at 2x ATR below current price (for longs).
Adjusts automatically to volatility.
Fixed Trail:
Trail stop a fixed amount (e.g., 15 points on ES) below highest price.
Simple but may not fit market structure.
Target Management
Fixed Targets:
Predetermined levels based on SMC (next OB, FVG, liquidity).
Exit when reached regardless of price action.
Simple and removes emotion.
Dynamic Targets:
Adjust targets based on how the trade is behaving.
If momentum is strong, extend target.
If momentum is weak, take profit early.
Requires more skill and can introduce emotion.
Combination Approach:
Fixed targets for scaled exits (1R, 2R).
Dynamic/trailing for runner portion.
Best of both worlds.
Adding to Winners
Adding to winning positions can increase profits:
Pyramid Add:
Initial entry: 50% of planned position.
After 1R profit: Add 30%.
After 2R profit: Add 20%.
Each add is smaller than previous.
Risk:
If the trade reverses, you have larger position at worse average.
Only add at logical SMC levels (new OB, FVG) not randomly.
Treat adds as new trades requiring confirmation.
When to Exit Early
Sometimes exiting before your plan is correct:
Structure Change: If market structure shifts against your trade (CHOCH against you), consider exit or partial exit.
Order Flow Shifts: If Order Flow that supported your entry turns against you (delta divergence, absorption against), consider exit.
Time Decay: If the trade has stalled for extended time without reaching target, consider exit. Your thesis may be wrong or the market may have changed.
News Approaching: If high-impact news approaches and you have profit, consider taking it rather than risking event volatility.
When to Hold
Equally important is knowing when to stay in:
Thesis Intact: Price action, structure, and Order Flow all still support your trade.
Just Noise: Minor pullbacks that do not break structure are not reasons to exit.
Higher Timeframe Support: Your higher timeframe analysis still supports the direction.
Exiting too early is one of the most common trader mistakes. Review your journal for trades you exited that went to target.
Trade Management Worksheet
For each trade, define:
Entry Price: _____
Initial Stop: _____
Initial Risk in R: 1R = $_____
Target 1: _____ (Take _____% at _____R)
Target 2: _____ (Take _____% at _____R)
Runner Plan: Trailing stop / Final target
Breakeven Move: After _____R
Early Exit Conditions: _____
Key Takeaways
Trade management often matters more than entry. Place stops at structural levels that invalidate your thesis. Scaling out reduces risk and captures profit across multiple scenarios. Move to breakeven after 1R to eliminate downside. Trail stops using structure, ATR, or fixed methods. Exit early if thesis breaks; hold if thesis remains intact. Plan management before entry; execute the plan after entry.
Congratulations! You have completed the Risk Management, Psychology, and Market-Specific Strategies module. You now have a comprehensive understanding of not just what to trade, but how to manage risk, your emotions, and specific market characteristics. Continue practicing and refining your approach.